In the last post we discussed the need for creating a branch – when we wanted to deviate from the main line of development. When you deviated, you didn’t want to come in the way of active development. Now lets say, you want your code to be integrated to the main line of development, so that other developers can code on top of it. This is what is called ‘merging’ of one branch into another.
We will see this in action now. To do that lets first enumerate some of the reasons for creating a branch. We will then take one of them as an example. The scenarios are as follows:
- You are working on something that you are not sure about that it will work.
- You are about to make some changes that may not be used (some POC).
- You are told to branch out, so that other can commit to the main line of dev.
- You are working on a feature that will have major(disruptive) impact. So you branch out which makes it easy to revert.
Lets us take the first scenario. You have seen the code in your project and you feel you can do something that can vastly improve the performance of the application. Now, first you want to test it out yourself, then show it to your seniors. If they approve and you want to put that into production.
There are three kinds of merges, we will discuss all of those now:
- Merge with linear path from source to target branch (Fast forward merge)
- Merge with no linear path, but has not conflicting changes (3-way merge)
- Merge with no linear path with conflicting changes (3-way merge with conflicts)
1. Merge with linear path from source to target branch
For this task, we will be creating a new branch and name it ‘my-awesome-feature’.

Since you have not yet made changes, both the branches point to the same commit. Now lets make some commits on the new-feature-branch.
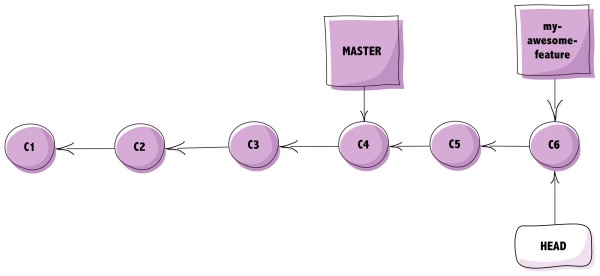
As you can see now, two more commits were made in my-awesome-feature branch. Now you are ready to put this code in production after you have seen that it is working and have got the necessary approvals (hurray!).
So the first thing to do, would be to checkout master branch. Because your target branch is my-new-feature which needs to be merged to master.
~/learngitwithme/learngitwithme$ git checkout master
Switched to branch 'master'
Checking out master branch will only change the HEAD pointer as described below:

Now run the following command – ‘git merge my-awesome-feature’. This will merge my-new-feature into master and it would look something how it is depicted below:

This type of merge is called fast-forward merge for the obvious reasons.
2. Merge with no linear path, but has not conflicting changes (3-way merge)
Let us go ahead and create this scenario. So as in the last example, you create the new-feature-branch and start working on it. But by the time you finish up your work, commits have been done on the master branch as well. So it looks something like this:

So now you see that the target cannot reach the source in a linear path. So this cannot be done using the fast forward merge. Git employs a 3-way merge. There are various merge strategies that can be used – http://git-scm.com/docs/merge-strategies.
It is called a 3-way merge because the merging is done using three commits:
- The target branch commit – c6
- The source branch commit – c8
- The nearest common ancestor – c4
Based on what is present and not present in these three commit, a merged commit is created. This is how master will look like after it has merge my-new-feature using a 3-way-merge (without conflict).

4. Merge with no linear path with conflicting changes (3-way merge with conflicts)
Now we will assume the same scenario that we did in the section 3, with the addition complexity of conflicting changes.
Conflicting change:
- You made a change to certain part of the codebase in brach my-new-feature.
- Someone else also made a change to same part in the master branch.
- So we have a conflict, because Git doesn’t know which one to take.
This will result in Git asking you to decide which changes are to be taken. When you ‘git merge’ command you see something like this:
I have created this scenario in our sample repository:
~/learngitwithme/learngitwithme$ git hist
* 418617b (HEAD, master) Adding some text in README-V2.txt
| * 04ce90d (feature-1) Added some more description in README-V2.txt'
|/
* 1070675 Renamed AnotherREADME.txt to REAME-V2.txt
* fb0cec8 Removed newFile.txt
* dac68ff Added newFile.txt and new content to README.txt
* 8248e59 Adding .gitignore file
* d19ba22 Added new content to README.txt
* e8d69a8 (origin/master) Modified README.txt and added AnotherREADME.txt
* 3dca5ca Adding README.txt file
Here the README-V2.txt have conflicting changes and you can see that we created feature-1 from master branch and then some development was done on master.
Not lets try and merge this:
~/learngitwithme/learngitwithme$ git checkout master
Already on 'master'
Your branch is ahead of 'origin/master' by 6 commits.
(use 'git push' to publish your local commits)
~/learngitwithme/learngitwithme$ git merge feature-1
Auto-merging README-V2.txt
CONFLICT (content): Merge conflict in README-V2.txt
Automatic merge failed; fix conflicts and then commit the result.
So Git tried to do automatic merge but it failed because of conflict. Let us try and open the conflicting file now:
~/learngitwithme/learngitwithme$ cat README-V2.txt
<<<<<<<<<<<<<<<<<< HEAD
Haven't learned git branching
=======
Learning branching in Git
>>>>>>>>>>>>>>>>>> feature-1
So here Git is clearly telling us HEAD, which is currently checkout branch – master has ‘Haven’t learned git branching’ which is conflicting with ‘feature-1’ which has ‘Learning branching in Git’. Now all you need to do is decide which one you want to have.
Let go ahead and keep ‘Learning branching in Git’ and remove everthing else.
~/learngitwithme/learngitwithme$ cat README-V2.txt
Learning branching in Git

~/learngitwithme/learngitwithme$ git st
On branch master
Your branch is ahead of 'origin/master' by 6 commits.
(use 'git push' to publish your local commits)

You have unmerged paths.
(fix conflicts and run 'git commit')

Unmerged paths:
(use 'git add <file>...' to mark resolution)

both modified: README-V2.txt

no changes added to commit (use 'git add' and/or 'git commit -a')
As Git is telling you, after you have fixed the conflict, you can add the modified file and commit.
~/learngitwithme/learngitwithme$ git commit -am 'Fixed merge conflict'
[master 4dcb0d6] Fixed merge conflict
~/learngitwithme/learngitwithme$ git hist
* 4dcb0d6 (HEAD, master) Fixed merge conflict
|\
| * 04ce90d (feature-1) Added some more description in README-V2.txt'
* | 418617b Adding some text in README-V2.txt
|/
* 1070675 Renamed AnotherREADME.txt to REAME-V2.txt
* fb0cec8 Removed newFile.txt
* dac68ff Added newFile.txt and new content to README.txt
* 8248e59 Adding .gitignore file
* d19ba22 Added new content to README.txt
* e8d69a8 (origin/master) Modified README.txt and added AnotherREADME.txt
* 3dca5ca Adding README.txt file
As you saw, it created the same graph as before:
Note – You can also do this using the merge tool that we set up before. To do that simple run ‘git mergetool’ instead to ‘git merge’.
Since we are aware of the concept of merging, let go ahead and talk about fetch-vs-pull.
—
Reference – https://git-scm.com/book/en/v2/Git-Branching-Basic-Branching-and-Merging
Tagged: Merging

Leave a comment